
How to use
From installing the app to your first day of records. This page also covers choosing between the diary, summary and minutes that arrive each morning, and how to connect your AI.
Getting started
- Get it on the App StoreInstall Ears for AI on your iPhone (iOS 26 or later).

- Read the intro and allow the microphoneThe microphone is the only permission you need at first. Location and Calendars aren't requested here. The app asks for them later, when you set up a place to turn off, or when it asks whether to add where you talked and your calendar events.
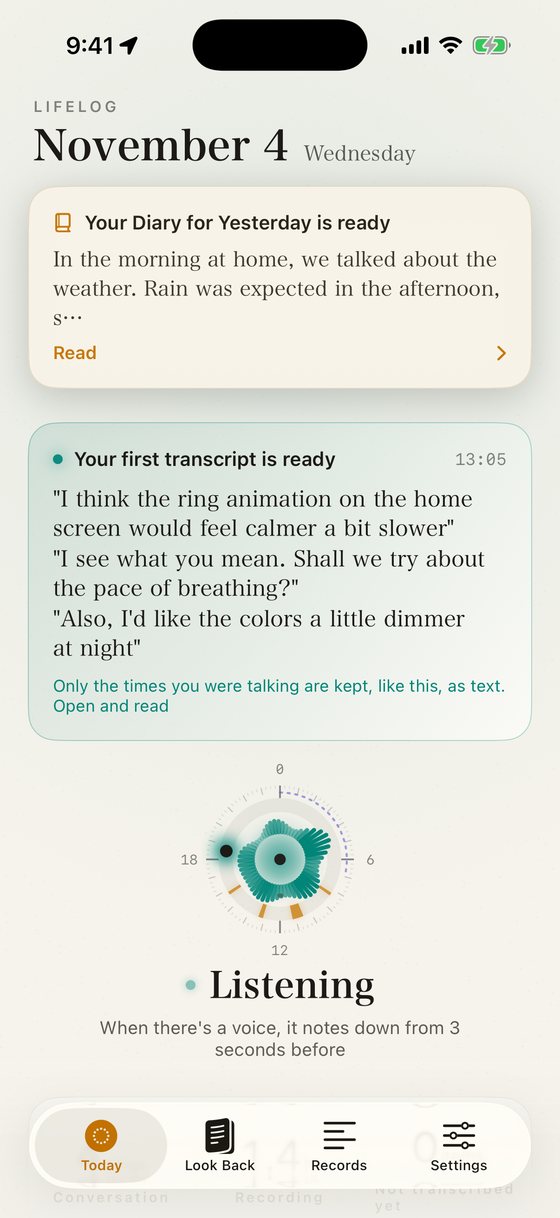
- "Start recording"Before you record, tell the people around you and get their consent. In some countries and regions (such as some US states), recording a conversation requires everyone's consent. Follow the laws where you live and where you use the app; this is your responsibility. You can read this again anytime in "Settings → About recording". After that, just keep your iPhone in your pocket. The ring on the Today tab lights up for the times you were talking.
Everyday use
When it hears a voice, it keeps the 3 seconds before it too.Nothing is saved while it's quiet. In "Settings → Recording → Advanced", you can set the "Listening level" to Automatic (it adapts to how quiet your surroundings are) or Manual (starting at -45 dB). On Manual, move it left if it misses too much, or right if it picks up too much in noisy places.
Stopping and starting.You can tap "Stop" right on the recording indicator on the Lock Screen and in the Dynamic Island. Tapping the indicator opens the Today tab. If you add Ears for AI to Control Center, each tap turns recording on or off (in Control Center, tap "+" at the top left → "Add a Control" → "Ears for AI"). Recording keeps going even if you don't allow the Lock Screen indicator (Live Activities).
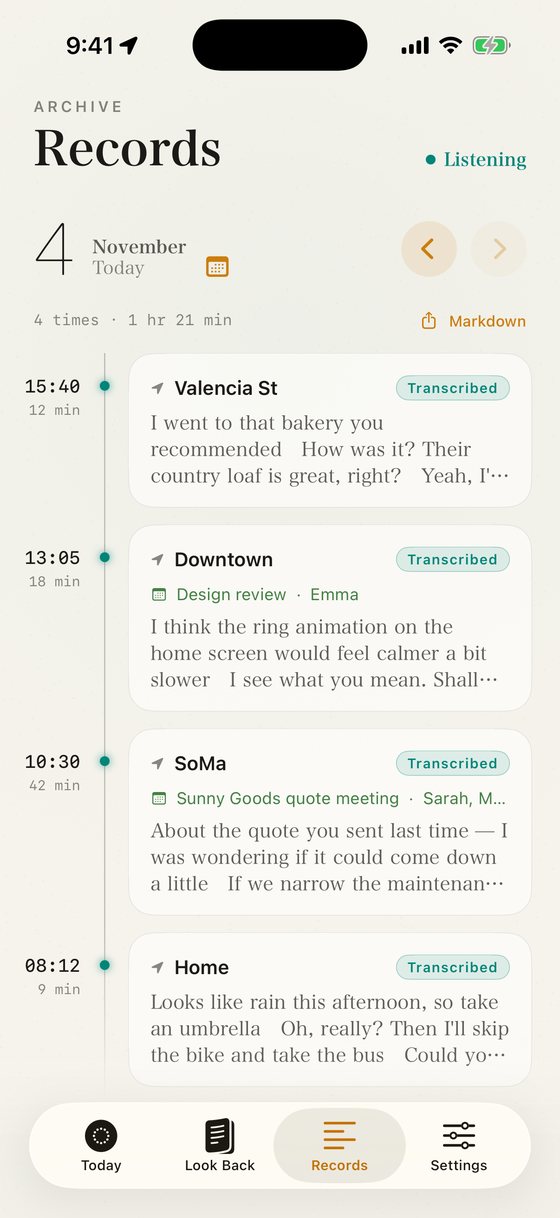
Transcription happens on your iPhone.For the first 48 hours, recordings are transcribed as soon as they're captured, so you can check them right away. After that, recordings usually pile up and are transcribed together while your iPhone is charging. If you're in a hurry, tap "Transcribe now" on the Today tab. You can also choose "As soon as it's recorded" in "Settings → Transcription" (this uses more battery).
Adding places and events.After a while, the app asks whether to add where you talked and your calendar events to your records. If you'd like that, allow Location and Calendars. The address of where you talked, and the title and attendees of any event at that time, are added to the record. You can change this later in the iPhone's Settings.
Nothing is kept while video or music plays through the iPhone's speaker.That's because the microphone would pick up sound from other apps, like YouTube or a music app (the microphone keeps listening; it just pauses saving). When you listen with earphones or over Bluetooth, the sound doesn't reach the microphone, so recording continues as usual.
Recording pauses while a phone call or another app uses the microphone.It resumes automatically when they're done. If it can't, you'll get a notification; tap it, or tap "Resume" on the Lock Screen. It's handy to assign "Start recording" to the Action button or a shortcut.
Turning off by place and time
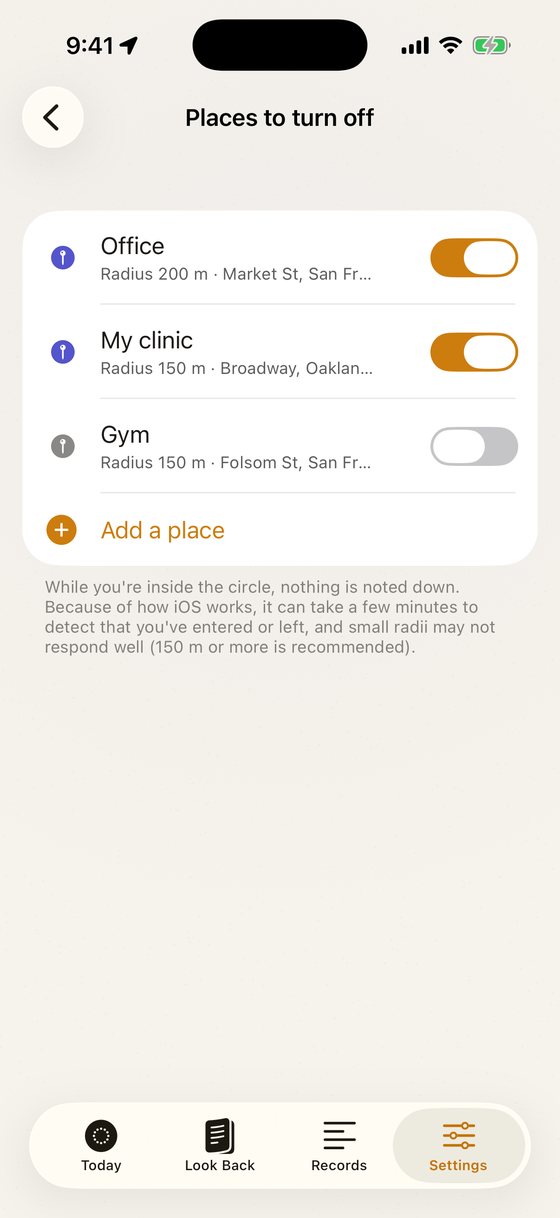
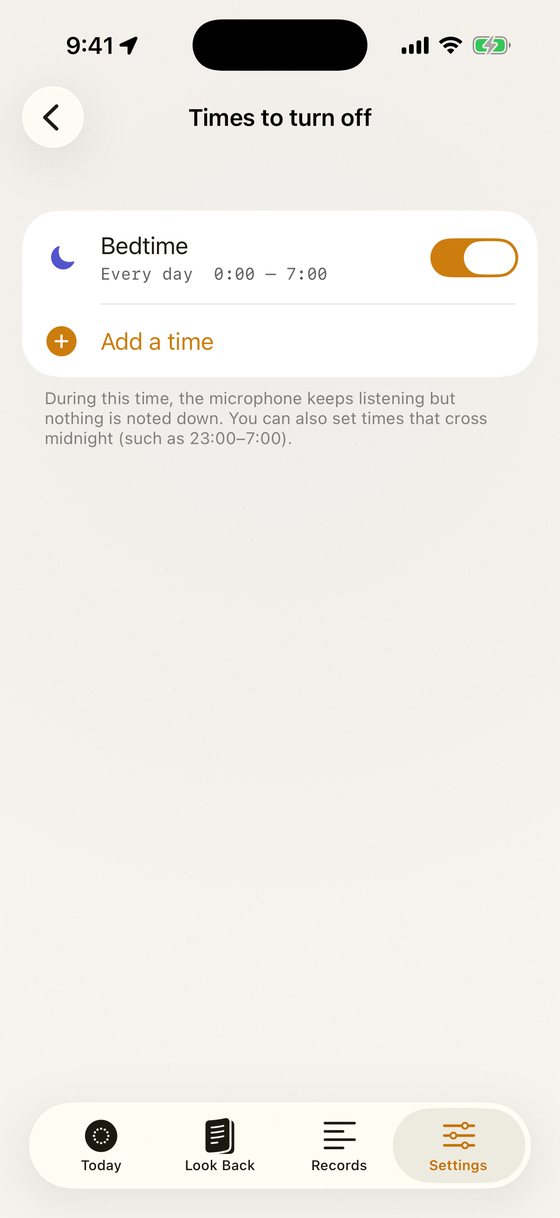
Set these up in "Settings → Automatic off". You can add as many of each as you like, and nothing is recorded during them.
- Times to turn off: choose a name, start, end and days of the week. For example, "Bedtime, every day, 12:00 AM–7:00 AM" or "Weekly meeting, Mon and Wed, 10:00–11:00 AM". A time can run past midnight.
- Places to turn off: search by address or name, tap the map, or choose "Use where I am now", then pick a radius (50 m to 2 km). The first time, the app asks for location permission. Choose "Always" so it can tell when you arrive or leave even when the app is closed. Because of how iOS works, it can take a few minutes to notice, so we recommend a radius of 150 m or more.
Connecting an AI (AI features, paid)
First, start AI features in the app. Then connect Ears for AI to the AI you use. Claude works on its free plan too; Grok and Muse depend on your plan and country (as of November 2026; see "Which AIs and plans work" below). With Muse, you just ask in a chat and it connects for you.
- Go to Settings → AI features and tap "Connect AI"You can also open it from "Ask AI about that day's conversations" at the bottom of the Today tab.
- Check what it does and the price, then tap "Next"It's free for 14 days, then a monthly or yearly subscription at the price shown on the App Store.
- Check what's sent and what isn'tAudio is never sent. Only transcripts, the addresses of places and your events are sent (places and events only if you've chosen to add them). Once you've read it, tick the box below and tap "Continue with Apple".
- Sign in with Apple and choose a planYour Apple ID is used only to link your purchase to your records. We don't receive your name or email address.
- Copy the URL to connect toAfter purchase, you'll see the Welcome screen with the URL to connect to. Tap "Copy address" and paste it into your AI in the next steps. Any records you made while using the app for free are sent at this point too.
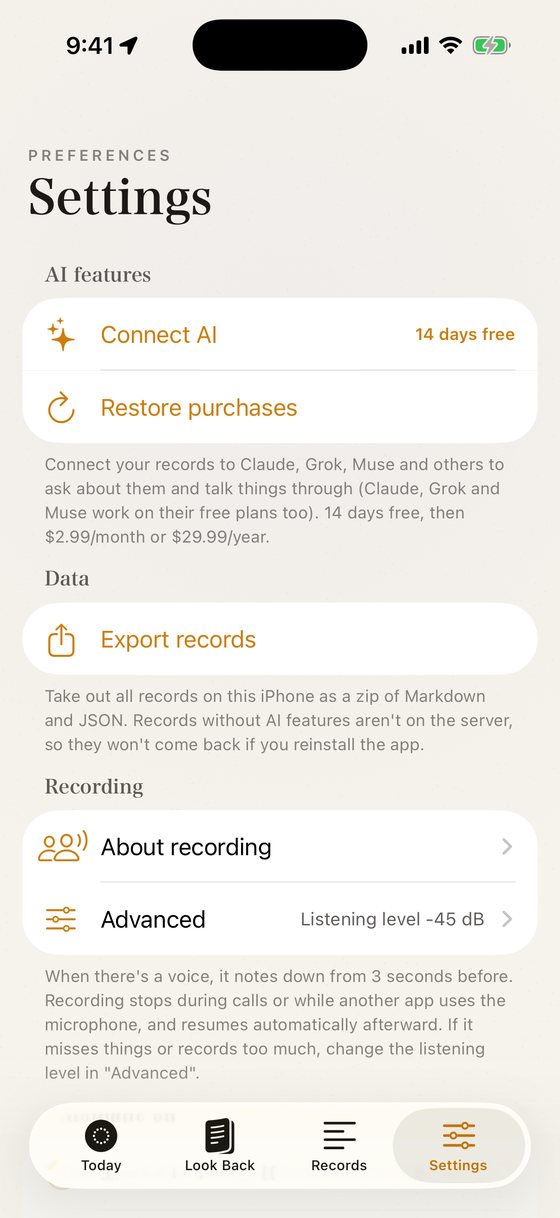
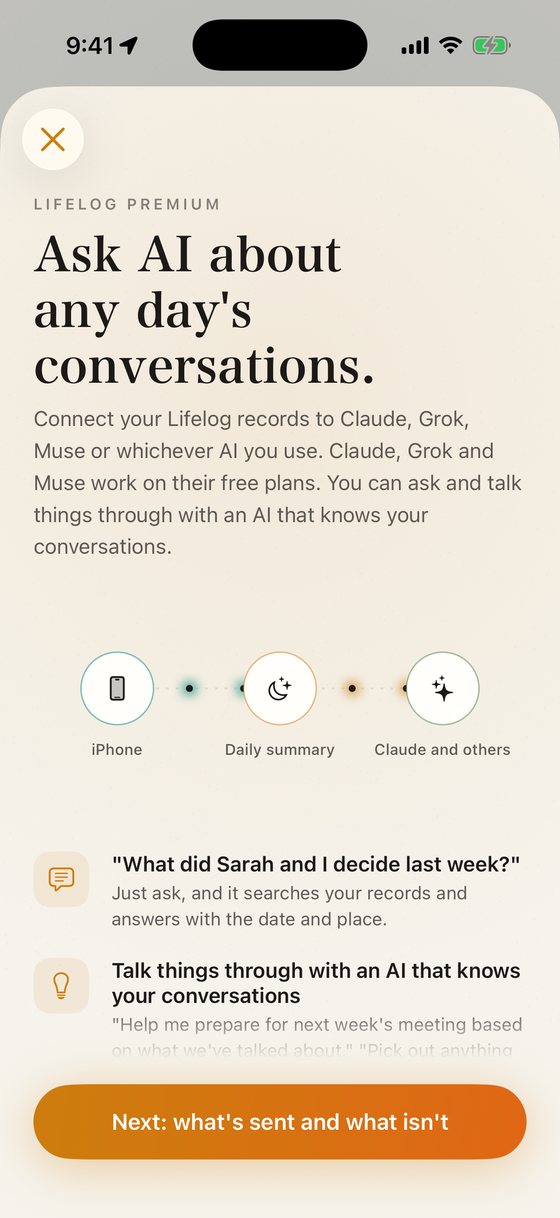
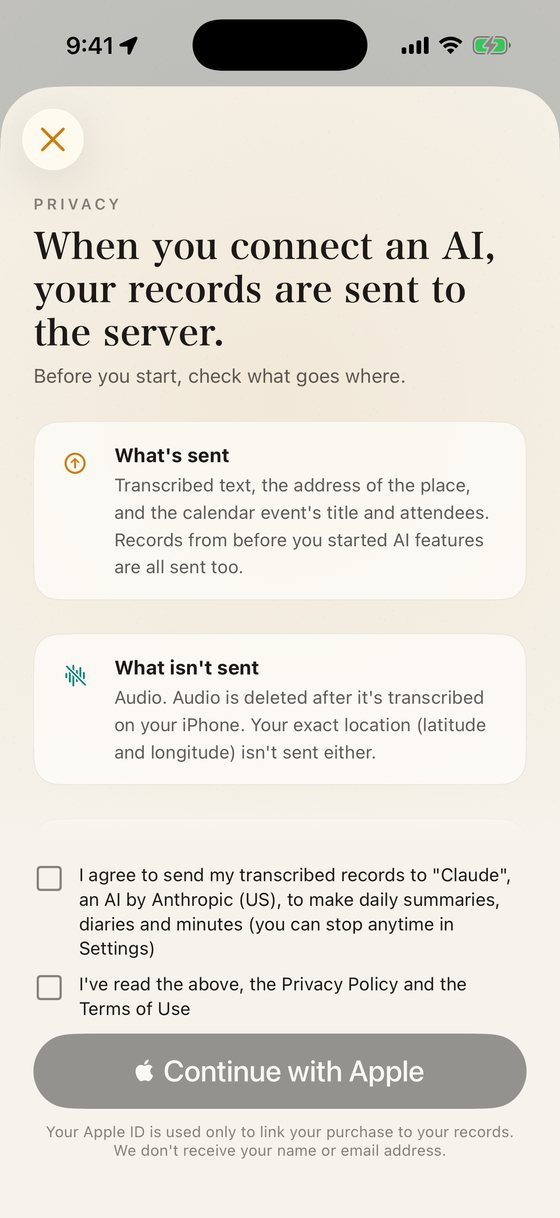
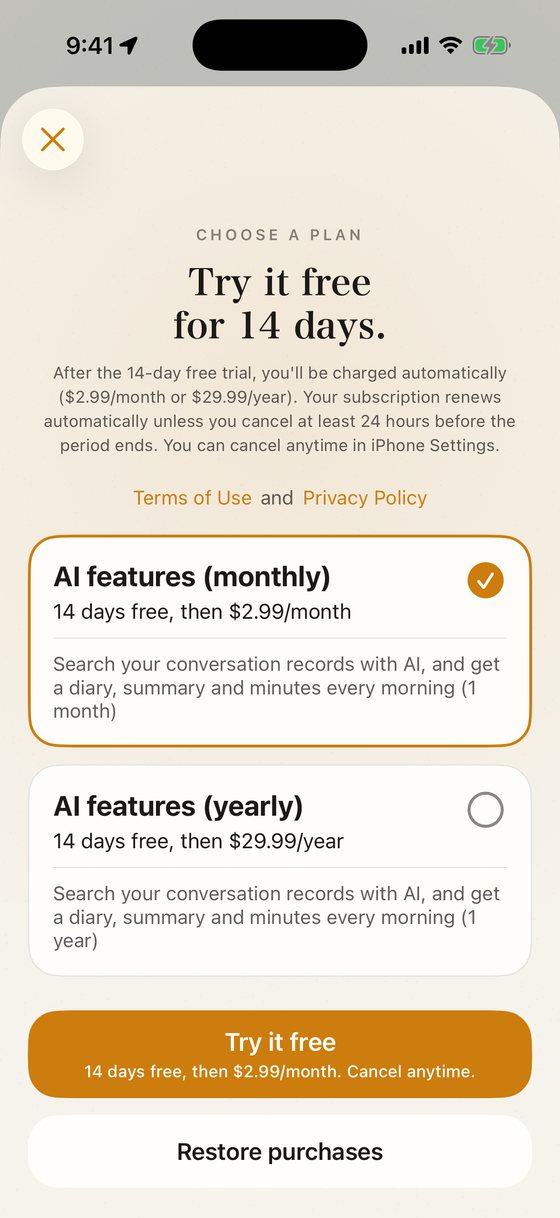
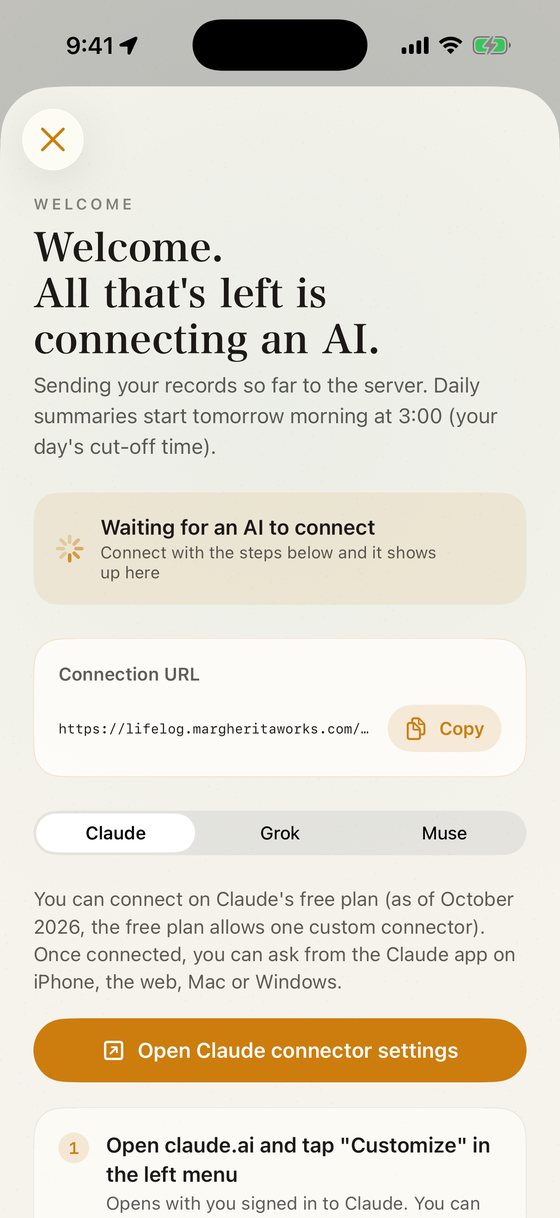
You can also copy the URL to connect to here.
https://lifelog.margheritaworks.com/mcpWhich AIs and plans work
| Claude | Works on the free plan too (as of November 2026).Custom connectors work on Free, Pro, Max, Team and Enterprise (the Free plan is limited to one custom connector). You add it on the web (claude.ai) or in the desktop app. Once it's added, it also works in the Claude app on iPhone. |
|---|---|
| Grok | Works if Connectors appears in your Grok settings (as of November 2026).Connectors are available on Grok on the web (grok.com), iOS and Android. xAI doesn't clearly state which plans include custom connectors. |
| Muse | Availability depends on your country (as of November 2026).Muse, Meta's personal AI agent, is available in the US and some other countries. It's free with usage limits, with paid tiers too. You connect it by sending the URL in a chat. |
| ChatGPT | Only on some plans, from the web (as of November 2026).According to OpenAI, full support for custom MCP servers is a beta for Business, Enterprise and Edu, which an admin turns on. Pro can connect in developer mode, but can only read your records. We can't promise it works on Plus or Free. It can't be set up from the ChatGPT app on a phone. |
Based on information from Anthropic, xAI, Meta and OpenAI as of November 2026. Any AI plan is paid to that company, separately from Ears for AI's AI features.
Connecting Claude, Grok or Muse
Choose the AI you use.
Connecting Claude
This works on Claude's free plan too (one custom connector, as of November 2026). You can do it on claude.ai in a browser (on a computer or in Safari on iPhone) or in the Claude desktop app. On Team and Enterprise, an Owner first adds it in Organization settings → Connectors, then members tap "Connect".
- Open claude.ai and choose "Customize" in the menu on the leftMake sure you're signed in to Claude. You can also go straight to claude.ai/customize/connectors.
- "Connectors" → "+ Add" at the top right → "Add custom connector"
- Enter a name and the URL, then "Continue" and "Add"For the name, use "Ears for AI" (anything works). For the remote MCP server URL, paste
https://lifelog.margheritaworks.com/mcp, which you copied above. On the next screen, leave the sign-in settings as they are and tap "Add". - On Ears for AI's screen, "Sign in with Apple to connect"You'll switch to an Ears for AI screen. Sign in with the same Apple ID you use for your subscription in the iPhone app, and you'll be connected and taken back to Claude.
Connecting in Safari on iPhone
Tap "Open Claude connector settings" in the Ears for AI app, and claude.ai opens in Safari. If you aren't signed in to Claude, sign in first (if you sign in with an email address, enter the code you receive).
If it doesn't work
- It says a connector with this URL already exists: you've added Ears for AI before. Instead of adding it again, open "Ears for AI" in the list under "Customize → Connectors" and connect it again.
- It says "Account not found": first start AI features (the subscription) in the Ears for AI app on your iPhone, then sign in with the same Apple ID.
- It asks for permission every time you ask something: on the connector screen, under "Tool permissions", set the read-only tools to "Always allow".
Once it's added, you can use it from the Claude app on iPhone, the web and the desktop app. If Claude answers without using your Ears for AI records, check in Claude's "Customize → Connectors" that Ears for AI is connected.
Connecting Grok
You can connect if Connectors appears in your Grok settings (as of November 2026). You can do it in the Grok app on iPhone or in a browser at grok.com.
- In the Grok app, open Settings → "Connectors"Open the menu at the top left, tap the gear (Settings) at the bottom left, and choose "Connectors". On a computer, open grok.com/connectors and choose "New Connector" → "Custom".
- Tap "Connect" next to the custom connector at the bottomIt's the last item in the list.
- Enter a name and the URL, then add the connectorFor the name, use "Ears for AI" (anything works). For the server URL, paste
https://lifelog.margheritaworks.com/mcp, which you copied above. If your iPhone says the Grok app wants to use a website to sign in, tap "Continue". - On Ears for AI's screen, "Sign in with Apple to connect"You'll switch to an Ears for AI screen. Sign in with the same Apple ID you use for your subscription in the iPhone app, and you'll be connected and taken back to Grok.
If it doesn't work
- It says "Account not found": first start AI features (the subscription) in the Ears for AI app on your iPhone, then sign in with the same Apple ID. A browser on your computer may be signed in with a different Apple ID. Compare the Apple ID on screen (the email address and the mark) with the one shown under "Settings → AI features" in Ears for AI, and if they differ, choose again from "Sign in with a different Apple ID".
- Ears for AI is already in the list from before: don't add it again. Open "Ears for AI" under connected connectors and reconnect it.
If Grok answers without using your Ears for AI records, check "Connectors" in Settings (grok.com/connectors on a computer) to see that Ears for AI is connected.
Connecting Muse
Muse is available in the US and some other countries, so whether you can use it depends on where you are. It's free with usage limits, with paid tiers too (as of November 2026). With Muse, you connect by asking in a chat, not from the settings screen.Muse's connector settings don't have a place to add your own connector (as of November 2026). Send the URL in the main chat, and Muse connects it for you. We've tried this on iPhone.
- Send this in the main chatYou can paste it as is.
Connect to the MCP server at this URL: https://lifelog.margheritaworks.com/mcp - Tap the add button on the card in Muse's replyMuse explains what you need first (starting AI features in the Ears for AI app) and shows a card for adding a custom connector. Tap the card's add button.
- On the confirmation screen, check where it connects, then confirmMake sure it connects to
lifelog.margheritaworks.com, then confirm. If your iPhone says Muse wants to use a website to sign in, tap "Continue". - On Ears for AI's screen, "Sign in with Apple to connect"You'll see "Let Muse read your conversation records?" (connecting to agent.meta.ai). Sign in with the same Apple ID you use for your subscription in the iPhone app.
- Wait for Muse to check the connectionAfter the card shows it's been added, Muse checks the connection. This can take a few minutes. When Muse replies that Ears for AI is connected and ready, you're done. From then on, just talk to it as usual.
If it doesn't work
- No card appears, only a text reply: send the message above again, with the URL. Adding "as a custom connector" also works.
- It says "Account not found": first start AI features (the subscription) in the Ears for AI app on your iPhone, then sign in with the same Apple ID. Compare the Apple ID on screen with the one shown under "Settings → AI features" in Ears for AI, and if they differ, choose again from "Sign in with a different Apple ID".
- The card says it's added, but no reply comes: Muse is still checking the connection. Wait a little, then ask "Is Ears for AI connected?"
- You want to reconnect or stop using it: you can disconnect Ears for AI in Muse's settings. To reconnect, send the message above again.
Connecting ChatGPT
According to OpenAI (as of November 2026), full support for custom MCP servers is a beta for Business, Enterprise and Edu, and an admin needs to turn it on. Pro can connect in developer mode, but can only read your records. We can't promise it works on Plus or Free. Setup is on the web only (chatgpt.com in a browser, on a computer or in Safari on iPhone); it can't be done from the ChatGPT app. OpenAI has renamed this feature a few times (Connectors, Apps, Plugins), so the names you see may differ.
- Open chatgpt.com and go to "Plugins"Sign in to ChatGPT in a browser and open "Plugins" in Settings.
- "Add" → "Add custom MCP server"
- Enter a name and the Server URLFor the name, use "Ears for AI" (anything works). Under "Connection", keep "Server URL" and enter
https://lifelog.margheritaworks.com/mcp, which you copied above. - Set up authenticationChoose "OAuth".
- Read the warning, tick "I understand and want to continue", then "Create as a plugin"
- "Connect Ears for AI", then "Sign in with Apple to connect"On Ears for AI's screen, sign in with the same Apple ID as your subscription. When it's done, Ears for AI shows in your plugins.
- To use it, pick Ears for AI with @ in a new chatType
@in the message box, choose "Ears for AI", then ask your question.
On Pro, it can only read your records.The only Ears for AI action that changes your records is marking a to-do as done. Do that from Claude, Grok, Muse or the Ears for AI app on iPhone. On Business, Enterprise and Edu, you can also do it from ChatGPT (ChatGPT may ask you to confirm first).
What to ask your AI
Just ask as you normally would. Your AI searches Ears for AI and answers with the date, time and place.
- "What did Alex and I decide last week?"
- "List the to-dos from yesterday's meeting"
- "What did I talk about most this month?"
- "What was the quote amount we discussed downtown?"
Beyond questions, you can also ask for advice that draws on your conversations.
- "Based on what we've discussed so far, help me prepare for next week's meeting with Company A"
- "From my recent conversations, list what I've left unfinished"
- "Look back over this month's conversations and tell me what you notice"
Transcripts can contain mishearings, and they don't tell speakers apart. For anything important, check the original transcript (you can ask your AI to "show me the original text").
Diary, summary, minutes and the day cut-off
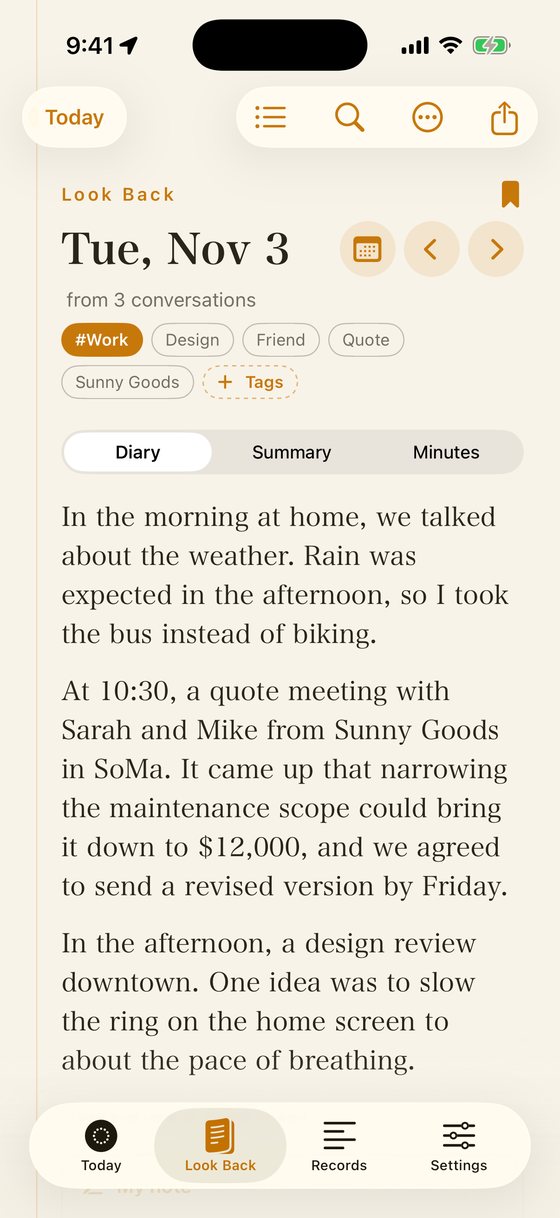
With AI features, every morning at 3 AM in your time zone, the 24 hours since 3 AM the day before are organized conversation by conversation and written up in the formats you've chosen. Work starts just after 3 AM and usually takes about an hour. They're written by Claude, an AI from Anthropic (US). They're written in your "Recording language" ("Settings → Transcription → Recording language"), which also sets the language for transcription and for your AI's answers. It's Automatic by default: your iPhone's language if supported, otherwise English.
| Summary | A short note on who you talked with, where and about what, conversation by conversation. Decisions and to-dos are listed too. Weekly and monthly summaries are made as well. |
|---|---|
| Minutes | For each conversation: date and time, place, attendees, topics, decisions and to-dos (with owners and due dates). Attendees come from the calendar event at that time. Because transcripts can't tell speakers apart, attendees and owners guessed from the content are marked as estimated, and marked unknown when the evidence is weak. |
| Diary | A diary of your day, written only from what was actually said. It doesn't add feelings or impressions on its own. |
Choose which formats to make in "Settings → AI features → Output formats".You can choose as many as you like; summary and diary are on to start with. Choose how the diary is written in "Settings → AI features → Diary style".You can change its tone, first-person voice, length (three lines, normal or detailed) and mood (just the facts, or a little softer).
Read your diary, summary and minutes on the "Look Back" tab in the menu at the bottom of the app. Use the arrows to move to the previous or next day, and tap a paragraph or item to open the transcript of the conversation it came from. Tapping a date heading in "Records" also opens Look Back for that day.
You can change this time in "Settings → AI features → Day cut-off", to any hour from 12 AM to 11 PM. If you work nights, set it to a time when you're usually asleep (for example, 12 PM) so the conversations from your shift are grouped into one day. A new cut-off applies to records that haven't been summarized yet.
Deleting records
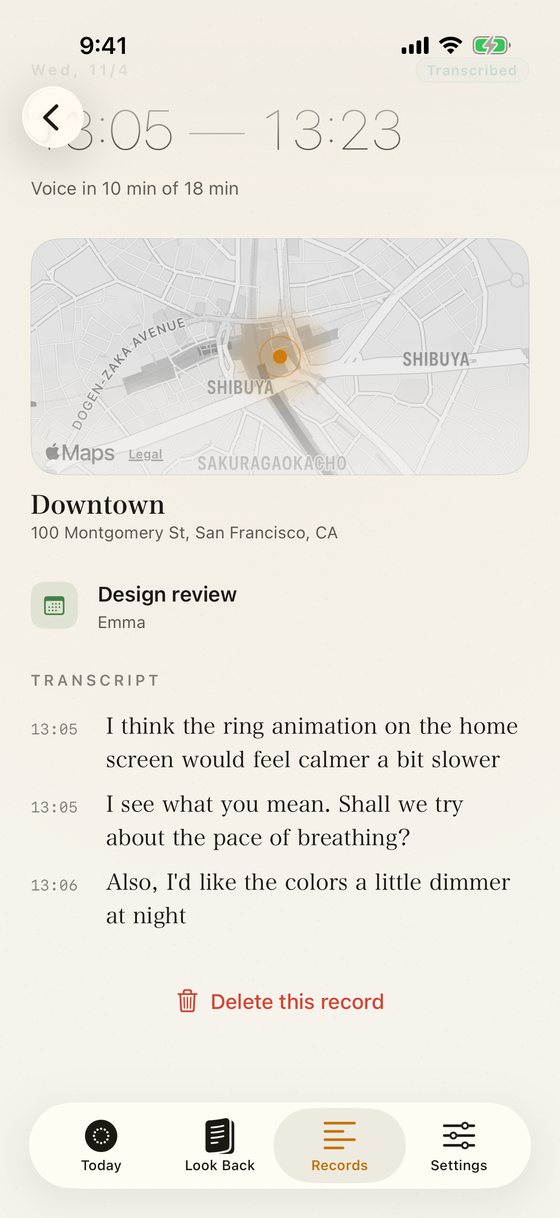
You can delete records you don't want to keep, one at a time. In "Records", swipe a record to the left and tap "Delete", or open the record and tap "Delete this record".
- The transcript and audio on your iPhone are deleted.
- If it was sent to the server with AI features, it's deleted from the server too. That day's diary, summary and minutes are remade without it at the next cut-off time (until then, you can still read them as they are).
- If you're offline, it's deleted from the server once you're back online.
- Deleted records can't be restored.
Exporting
In "Settings → Data → Export records", you can take all the records on your iPhone with you as a zip of Markdown and JSON. While you have AI features (and for 90 days after canceling), the daily summaries and to-dos on the server are included too.
While you have AI features, you can also use "Settings → AI features → Save server records as Markdown" to save the records on the server (daily summaries, conversations, to-dos and transcripts) as Markdown files for a day or period you choose: "That day only", "The week up to that day" or "Choose a period" (up to 31 days).